
This guide covers the connection itself: creating the endpoint, registering it in Slerp, and understanding what arrives. The last section shows one worked example, writing orders to a Google Sheet, but the connection is the same whatever you send your orders to.
Before you start
You will need:
- A Slerp account with access to the Integrations Marketplace
- A Zapier account on a paid plan. Webhooks by Zapier is a premium app
- The ability to place a test order on your store
Set aside about 20 minutes for the connection itself.
Part 1: Make the connection
Step 1: Choose your trigger type
In Zapier, select Create and then Zap. Click the Trigger step and choose Webhooks by Zapier.
You now pick a trigger event, and this choice matters more than any other decision in the setup.
Catch Raw Hook hands you the request body exactly as Slerp sent it, along with the request headers. You extract the fields you want in a following step. This is the recommended option.
Catch Hook parses the payload for you, so fields arrive ready to use with no code. It is quicker to set up, but it cannot represent Slerp order items, because it flattens only one level of nested array and Slerp nests modifier groups inside items and modifiers inside those. It also hides the request headers.
Choose Catch Raw Hook unless you are certain you will never need item detail. The extra step costs a few minutes and gives you field names you control, access to headers, and a payload that will not silently lose structure.
Click Continue.
Step 2: Copy your webhook URL
On the Test tab, click Copy.
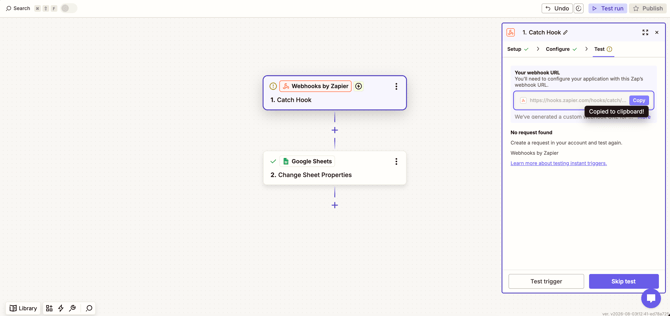
At this point Zapier says No request found. That is expected. Nothing has been sent yet.
Do not click Skip test. It sits next to Test trigger and is the more prominent button, but skipping means Zapier never learns your payload and no later step will have anything to work with.
Treat the webhook URL as a secret. There is no token or signature on it. Anyone holding the URL can send data to your Zap. Do not paste it into shared documents, tickets or screenshots.
Step 3: Add the webhook in Slerp
In Slerp, open the Integrations Marketplace. Under Connect your own tools, click Add Custom Webhook.
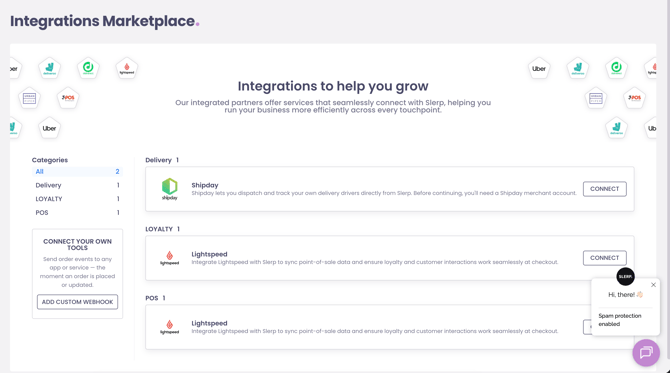
Fill in the form:
- Webhook name is a label for your own reference. Name it after the destination, for example
Zapier - Order Tracking. When you have several webhooks configured, this is the only thing distinguishing them. - Endpoint URL is the Zapier URL you copied. It must be HTTPS. HTTP is rejected.
- Request headers can be left empty. They are useful when your endpoint needs a shared secret, but Catch Hook does not expose incoming headers to your Zap, so nothing will check them. Only Catch Raw Hook makes headers visible.
Click Create Webhook.
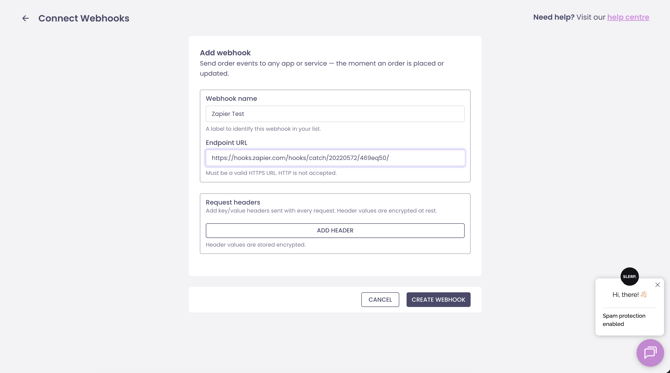
This webhook fires on all order events, both created and updated. Step 6 covers narrowing that down.
Step 4: Place a test order
Place a real order through your store.
Zapier cannot build a field list from a schema, only from traffic that has actually arrived. Nothing downstream is configurable until an event lands.
Use an order that contains everything you eventually want to capture. A pickup order sends null for all delivery fields, so those will not appear in the picker. If you need delivery addresses, place a delivery order.
Step 5: Test the trigger
Back in Zapier, click Test trigger.
You will see the whole body as a single Raw Body field, plus headers and querystring:
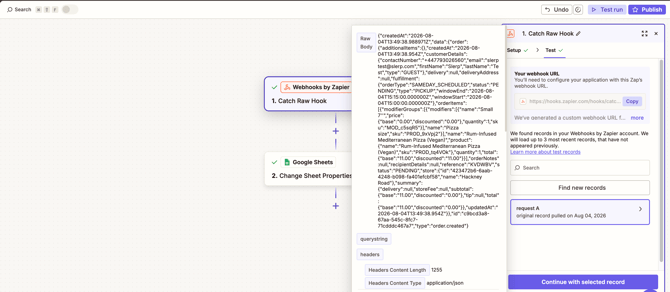
A successful test means the connection is live. Everything after this is about what you do with the data.
If you chose Catch Hook instead, the payload arrives broken into individual fields.
Nested values are flattened with a double underscore between levels, so customerDetails.email becomes data__order__customerDetails__email. The picker displays these as readable labels such as Data Order Customer Details Email.
The labels are long because everything sits under data then order. To shorten them, go back to Configure and set Pick off a Child Key to data.order. Zapier then treats the order as the root and the labels become Customer Details Email and so on. Note that this discards anything outside that key, including the top level event type, and it requires re-testing the trigger.
Step 6: Filter to the events you want
Because Slerp fires on updates as well as creation, an order that changes state several times will trigger the Zap each time. To act on new orders only:
Click the + below the trigger and choose Filter by Zapier. Set the condition to Type, (Text) Exactly matches, order.created.
The type field sits at the top level of every payload. Skip this if you want a full audit trail of every state change.
Step 7: Extract the fields you need
Add a step to turn the raw body into named fields. Click the + and choose Code by Zapier, then set the action event to Run Javascript.
(If you chose Catch Hook, skip this step. Your fields are already available, though without item detail.)
Under Input Data, add one row. Type raw_body in the left field. In the right field, select Raw Body from step 1 using the picker.
The left field is a variable name you choose. The right field must be an actual mapping selected from the picker, not typed text. Getting this wrong produces SyntaxError: "undefined" is not valid JSON, and it is the most common failure in this setup.
Paste this into the Code field:
const payload = JSON.parse(inputData.raw_body);
const order = payload.data.order;
return {
  order_id: order.reference,
  customer_name: `${order.customerDetails.firstName} ${order.customerDetails.lastName}`,
  email: order.customerDetails.email
};
Click Continue, then Test step. The Output Data panel shows the keys you returned:
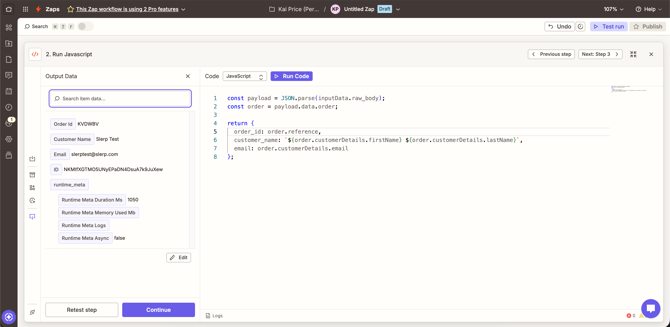
The keys you return become the only fields available downstream. Short, stable names here mean nothing breaks if a field is renamed inside the payload.
Notes on the code:
order.referenceis the identifier customers see on their confirmation. The UUID at the top level of the payload is the event ID, not the order.- This example returns three fields. To capture more, add them to the returned object using the paths in the payload reference, for example
status: order.statusorstore_name: order.store.name. - Objects that are
nullon some orders need guarding before you read into them.delivery,deliveryAddressandrecipientDetailsare allnullon a pickup order, soorder.delivery.deliveredAtthrows rather than returning empty. Use optional chaining for those, as inorder.delivery?.deliveredAt. - To produce one result per line item rather than per order, return an array of objects. Zapier then runs the remaining steps once per element.
Part 2: Worked example, orders into a Google Sheet
The connection is done. What follows is one thing you can do with it, chosen because it is the quickest way to see your order data land somewhere. Substitute any of Zapier's other apps and the first seven steps are unchanged.
Prepare the sheet
Create the spreadsheet before configuring the Zap. Zapier builds its list of columns by reading row 1, so the headers must already exist.
| Order Id | Name |
|---|
Headers are only recognised in row 1. Do not leave a blank row above them and do not use merged cells.
Header names do not need to match your field names. The headers control what the columns are called in the sheet, and you map values to them by hand.
Add the Google Sheets action
Click the + at the bottom of the Zap and choose Google Sheets. Set the action event to Create Spreadsheet Row.
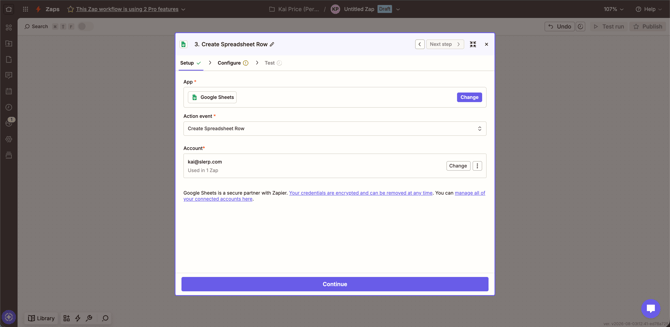
Set the action event before anything else. Changing it later clears every field below it.
Connect your Google account. Create and update actions need edit permission on the file, and on Google Workspace third party app access must be enabled.
Map the fields
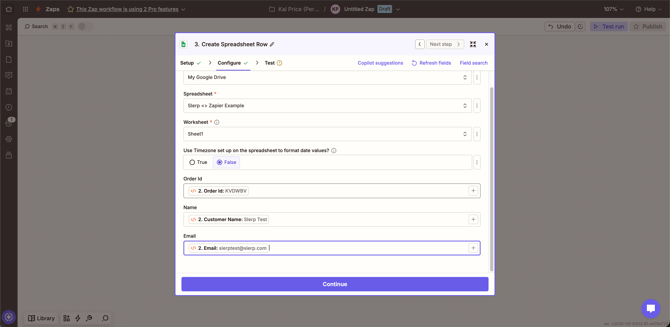
Choose the Drive, Spreadsheet and Worksheet. If the file lives in a shared drive, select that drive rather than My Google Drive.
Set Use Timezone set up on the spreadsheet to format date values to True. Slerp sends timestamps in UTC, so leaving this False means dates read an hour off during British Summer Time.
Your column headers now appear as fields. Click each one and select the matching value.
The picker lists everything the previous steps produced:
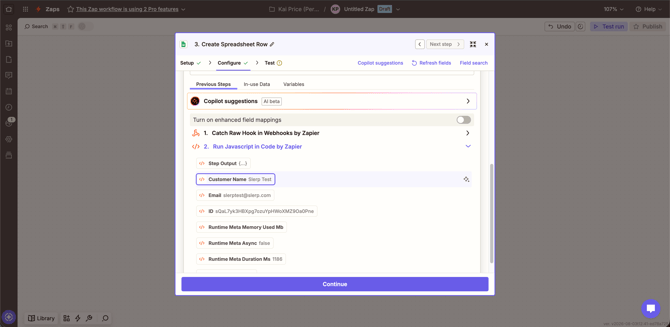
Ignore the ID and Runtime Meta entries. Those are Zapier's own diagnostics. The ID value changes on every run and is not usable as an identifier.
Test and publish
The Test tab previews the row before writing it:
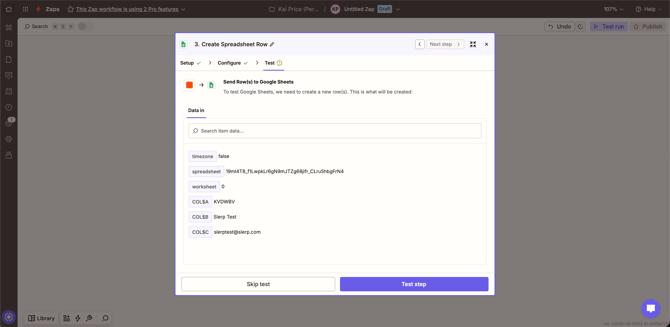
Columns are labelled positionally here as COL$A, COL$B and so on rather than by header name. That is expected on this tab.
Click Test step. The Data out tab confirms what was written, including the row number:
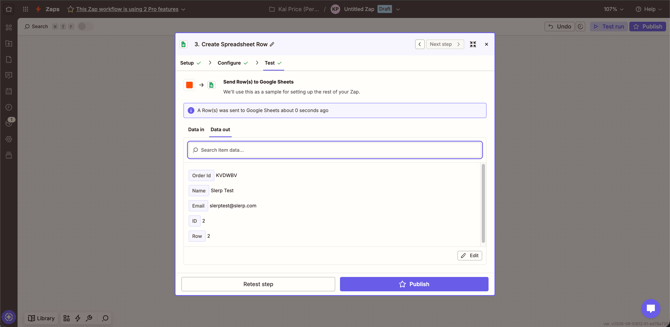
Open the spreadsheet and check it:
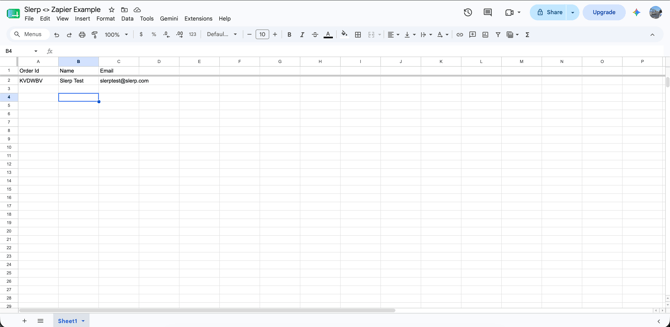
Then click Publish. The Zap does not process live orders until it is published and switched on. Place one more test order to confirm a row appears without you doing anything.
Two different fields are labelled ID. On the code step, ID is a random per run identifier generated by Zapier that changes every time. On the Sheets step, ID is the spreadsheet row number. Neither is an order identifier. Use order_id.
Troubleshooting
No request found on the trigger test. Nothing has reached the URL. Check the endpoint in Slerp for a typo or trailing space, confirm it is HTTPS, and place another order. Zapier shows the three most recent requests received in the last hour.
A field is missing from the picker. It was absent from your test payload. Send an order that includes it and test the trigger again. Fields that are null, such as delivery details on a pickup order, will not appear.
SyntaxError: "undefined" is not valid JSON. The code step is not receiving the payload. Check that Input Data has a row whose key is exactly raw_body and whose value is the Raw Body pill selected from the picker.
A column is empty in the destination. If you are using code, the key was probably misspelled. Zapier drops keys with undefined values silently rather than failing, so the step still passes. Check the Output Data panel for the exact key names.
Fields show as COL$A, COL$B on the Configure tab. The worksheet has no header row, or there is a blank row above the headers. These positional labels are normal on the Test tab preview, so only treat them as a problem if they appear where you expect your column names.
Columns changed and the Zap stopped filling them. Zapier caches the header list. Open the step, click Refresh fields, remap anything that moved, and publish again. Repeat whenever the destination structure changes.
Duplicate rows for the same order. The webhook is firing on updates as well as creation. Add the filter in step 6.
The Zap is off but requests still return success. After a Zap is switched off or deleted, the URL can keep returning 200 for a few hours before it starts returning 404.
For the structure of the event body, field by field, see Slerp order webhook payload reference.
A note on support. Code steps are an advanced Zapier feature and Zapier support does not debug custom scripts. If your code stops working after a change, check the Output Data panel on the code step first.