
Set-Up Guide
See recommended compatible printers here.
Before you start
Before connecting your printer, please check the following:
- your Slerp Partner App is updated to the latest available version 2.9.107
- your printer is powered on
- paper is loaded correctly
- your tablet or device has a stable connection
- your printer’s Bluetooth, WiFi, or Ethernet option is enabled, depending on how you want to connect
Where to find printer setup
In the Slerp Partner App:
- Open the app and log in.
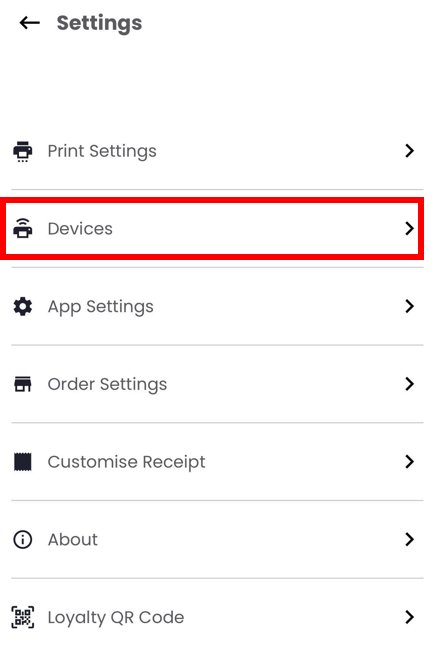
- Go to Settings.
- Tap Devices.
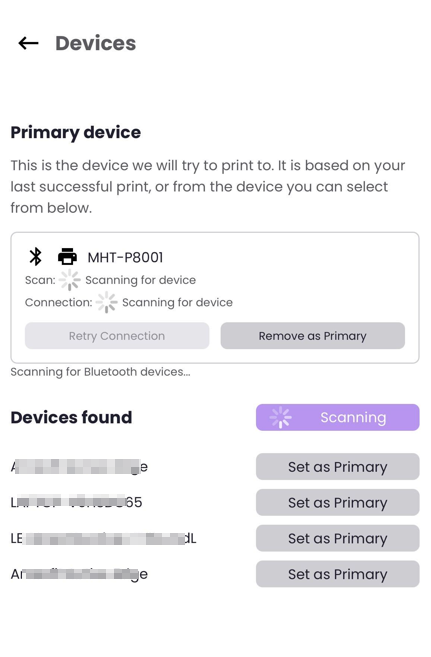
- The app will show your current Primary device and begin scanning for available devices.
The Primary device is the printer the app will try to print to first. It is based on your last successful print, or the device you choose from the list.
Connect a printer by Bluetooth
Use this option if your printer connects wirelessly by Bluetooth.
- Turn on the printer.
- Make sure Bluetooth is enabled on the printer.
- On your tablet or phone, open the device’s Bluetooth settings and confirm Bluetooth is turned on.
- If your printer has a pairing button or pairing mode, enable it.
- Open the Slerp Partner App → Settings → Devices.
- Wait while the app scans for Bluetooth devices.
- When your printer appears in Devices found, tap Set as Primary.
- Wait for the connection status to update.
- Once connected, print a test order to confirm everything is working.
If your Bluetooth printer does not appear
Please check that:
- the printer is switched on
- the printer is in pairing mode if required
- Bluetooth is enabled on the device you are using
- the printer is not already connected to another tablet or phone
- you are standing close enough to the printer for Bluetooth to detect it
If needed, tap Retry Connection or remove the printer and scan again.
Connect a printer by WiFi
Use this option if your printer is set up to connect over your local wireless network.
- Turn on the printer.
- Make sure the printer’s WiFi function is enabled.
- Confirm the printer is connected to the same network used for your setup, where required by the printer model.
- Open the Slerp Partner App → Settings → Devices.
- Wait for the app to scan for available devices.
- When your printer appears, tap Set as Primary.
- Print a test order to confirm the connection is working.
Important for WiFi setup
The app interface shows available devices in the Devices screen. Based on the current setup flow, the printer should appear once its WiFi option is enabled and the printer is discoverable on the network. If it does not appear, check the printer’s own network settings and confirm WiFi has been fully configured on the printer.
Connect a printer by Ethernet
Use this option if your printer is connected by network cable.
- Turn on the printer.
- Connect the printer to power.
- Connect the Ethernet cable securely to the printer and network point or router.
- Make sure the printer’s Ethernet or LAN connection is enabled if your printer model has a setting for this.
- Open the Slerp Partner App → Settings → Devices.
- Wait for the app to scan for available devices.
- When your printer appears, tap Set as Primary.
- Print a test order to confirm the connection is working.
Important for Ethernet setup
The app interface does not show a separate Ethernet button. The printer should appear in the Devices list once the wired connection is active and the printer is discoverable. If it does not appear, check the cable, network connection, and the printer’s own network settings.
How to change or remove your primary printer
If the wrong printer is selected, or you want to switch devices:
- Go to Settings → Devices.
- Under Primary device, find the current printer.
- Tap Remove as Primary.
- Wait for the app to scan again.
- In Devices found, tap Set as Primary on the printer you want to use.
Test the printer
After setup:
- Open an existing accepted order in the Partner App.
- Tap Print.
- Confirm the printer responds and prints clearly.
- If needed, place a small test order and check it prints as expected.
Printer compatibility
For recommended compatible printer models, see Connect your printer to Partner App.
Other printers may still work, but we recommend using a tested model where possible.
Important
- On iOS, the update is available now.
- On Android, the update is rolling out in stages over the coming days.