
How to create a new location
Login as admin to Controls → Locations → + ADD LOCATION button.
You may also access this Quick Link ⚡New Location
Step 1 - location details
- Name - Please enter the name of your new store or location here.
- Email Address - Provide an email address to receive notifications for each order placed at your store. This email can also be used for our Support Team and your customers to reach you.
- Contact Phone Number - This information will be accessible to courier drivers, our support team, and your customers, allowing to contact you directly. Your phone number will be included in the confirmation email automatically sent to customers after they successfully place an order.
- Physical Address - Make sure to enter an accurate address, as both customers and couriers will use it to locate your store.
- Location URL - Is required however is also auto-populated once you type the new store/location name.
- Courier Instructions - This section is intended solely for couriers and will not be visible to customers. Please provide any specific details that might assist drivers in finding your store easily, such as "Our store is located next to the yellow building."
- Important Note: This information is only necessary if you have chosen to partner with one of our integrated courier services. If you are handling your own deliveries, you may skip this step.

Step 2 - Location users

These is the login for your staff or other team members
-
First Name: Please enter the name of the staff member if you are setting up a personal store user login, or a generic name if you are creating a login for a group store.
-
Last Name: Please provide the last name as described above.
-
Email: This email address will serve as the username for logging into:
-
the Slerp App on your tablet, allowing the user to manage incoming orders (accept/reject) specifically for this store.
-
the Slerp Controls dashboard, which will enable the user to process refunds for this store only when necessary.
-
WARNING:
1. The email you enter here will be creating a Username to log into this specific store only, therefore it must be unique, please make sure it is not already registered as a admin user or store user for another location.
2. Since its purpose is to purely be a username, you can also enter a "fake" email address (i.e. 123deliveries@test.com). You don't need to create a new email inbox to create a store user, but in case you use a fake email, please remember to note down the password you choose. You won't be able to reset the password since it is not associated to a real inbox, therefore the reset link can not be sent.
3. Please also note: this email will not receive confirmation emails when an order is placed. Please refer to Step 1, point 2 to check which email is set to receive the confirmation emails for new orders.
- Password: Please choose the password for this store user.
How to reset your password
In case you forget this password or the user needs to reset it and choose a new password:
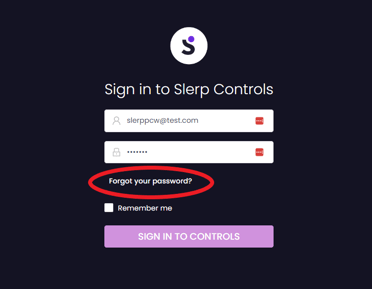
1. Navigate to the sign in homepage https://controls.slerp.com/ via a browser
2. Click on "Forgot your password"
3. Enter your username email you entered in step 3 above. A link will be instantly sent to that email to reset and choose a new password. As per above, you can only reset the password if the username email is an existing inbox.
- Submit: Congratulations! Your new store has been successfully set up.
- You can create multiple and unique store users for the same store by clicking the button + ADD button.