
Overview
To connect Slerp to Lightspeed you need to do the following:
-
Contact Lightspeed to activate Online Ordering for your business.
-
In Lightspeed, configure Order Profiles for Slerp pickup and delivery orders.
-
In Lightspeed, create the required products used to pass delivery fees, discounts, and gift notes back to Lightspeed. These products must exist in your menu for Slerp to attribute values correctly, such as:
-
Delivery fees
-
Delivery discounts
-
Product discounts
-
Gift notes
-
-
In Controls, connect Slerp to your Lightspeed business.
-
In Controls, map your Slerp stores to the correct Lightspeed location and menu.
Module Activation in K-Series Backoffice
Step 1. Activate Online Ordering in Lightspeed.
To activate the Online Ordering Module and External Payment Module in the merchant’s K-Series backoffice. These modules must be enabled for K-Series Merchants by a Lightspeed support user.
To request activation for K-Series merchants:
-
Send an email to k-series.support@lightspeedhq.com.
-
CC your account owner for approval.
Here is an example email template:
Subject: Activation of Online Ordering Module
Hi K-Series Support,
Please activate the Online Ordering module for the following
Lightspeed K-Series merchant:
- Name of Integration: Slerp x K-Series
- Business Name: [Your Lightspeed Business Name]
- Business ID: [Your Lightspeed Business ID]
- Business Location ID: [Your Location ID]
- Description of Request: Activate Online Ordering Module.
Thank you,
[Your Name]
Step 2. Configure Slerp Order Profiles.
You will need to create the following Order Profiles to support Pickup and Delivery:
-
Pickup Order Profile:
-
Name: Slerp Pickup
-
Code: slerp-pickup
-
Takeaway mode: Pick up
- Order Completion: Complete when delivered
-
-
Delivery Order Profile:
-
Name: Slerp Delivery
-
Code: slerp-delivery
-
Takeaway mode: Delivery
-
Show delivery code on receipt: Enabled
-
For more information on the best way to configure Lightspeed to work with Slerp, please see our full setup guide here.
Creating Products to Pass Fees to Slerp
✏️ If you want to support any of the options below, the corresponding product must exist in your Lightspeed inventory. They do not have to be assigned to a menu.
To ensure delivery fees, discounts, and gift notes are correctly sent to Lightspeed, you need to create specific products in your menu. These products allow us to attribute fees and discounts accurately when orders are passed back to Lightspeed.
Delivery Fees- Name: Slerp Delivery Fee
- SKU: SLERP_DELIVERY_FEE
- Type: Manually-entered price
Basket Discount
- Name: Discount
- SKU: SLERP_DISCOUNT
- Type: Manually-entered price
- Name: Giftnote
- SKU: SLERP_GIFT_NOTE
- Type: Manually-entered price
Service Fee
- Name: Service Fee
- SKU: SLERP_SERVICE_FEE
- Type: Manually-entered price
Once these products are set up, delivery fees, discounts, and gift notes will be passed to Lightspeed correctly on each order.
Connecting Slerp to Lightspeed
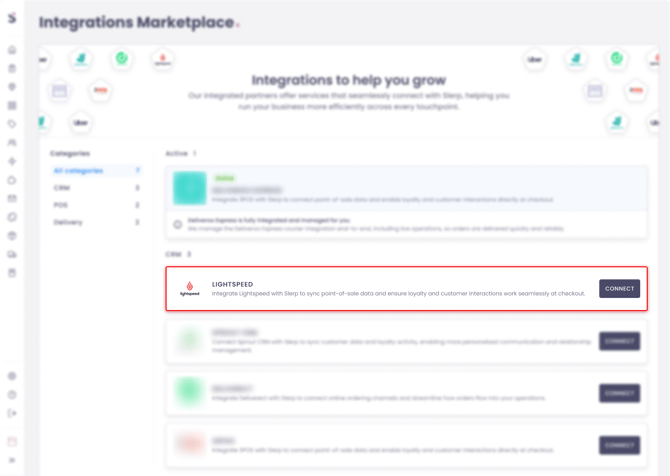
Step 1. Log into Controls and navigate to the Integrations section.
Step 2. Locate Lightspeed in your list of integrations and click Connect
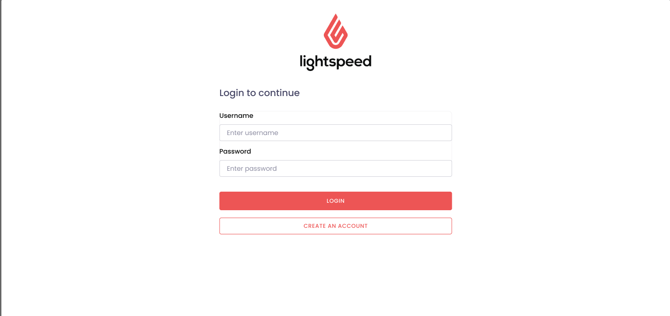
Step 3. You will be taken to the Lightspeed page, where you will need to Connect your business. Click Connect.

Step 4. You will be redirected to the Lightspeed login screen where you will need to log in.
Step 5. Once you have logged in you will need to grant Slerp the permissions by clicking yes

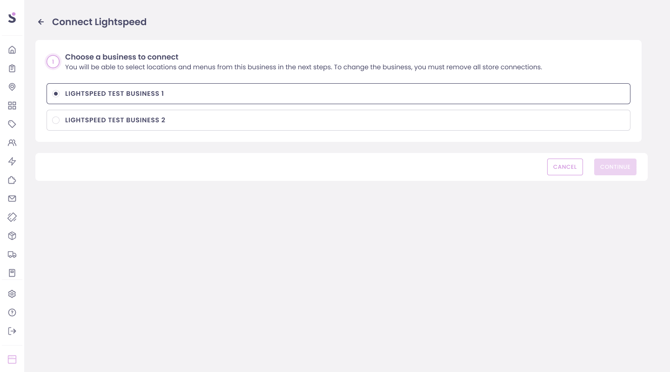
Step 6. Select the business you want to link to your Slerp Space and Continue.
Please note, you can only link a single business.
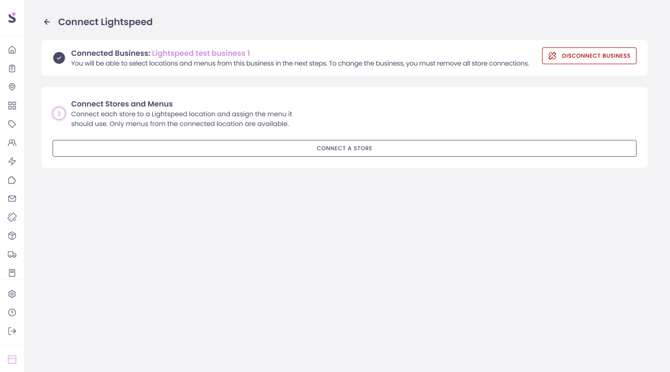
Step 7. You will now need to click Connect a Store.
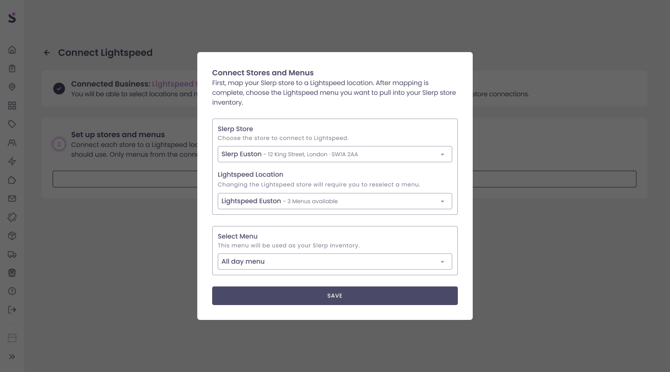
Step 8. Select the Slerp Store and Lightspeed location that you want to connect. Once they are connected, select the menu you want to display on the Slerp Store. Finally, press Save.
Step 9. The menu will be synced from the Lightspeed POS once you select the store and click Sync Menu(s). If you wish, you can connect multiple stores.

Step 10. Make sure that your POS is turned on and connected to the internet and that you have reloaded it (This can be found under settings on the POS).
Step 11. Review your inventory is as expected and place a test order!