
A segment in CRM is essentially a saved search that automatically groups contacts based on the rules or filters you set.
The value of your CRM is not just the size of your database. It’s what you do with it.
Segmentation and automation help you send more relevant campaigns, clean up unengaged contacts, and reduce manual follow-up work.
Build segments from customer data
In Slerp CRM, you can filter contacts using different types of data.
This may include:
- Tags
- Purchase history
- Transaction value
- Item descriptions
- Engagement history
- Data collected through connected tools
Tags are especially useful for finding where contacts came from and how they have interacted with your brand. For example, a contact might be tagged based on whether they ordered through Slerp, signed up through your website, or booked through a connected platform such as OpenTable.
This makes it easier to create targeted groups instead of sending the same message to everyone.
Use tags to organise your contacts
Tags is a standard contact field available on all accounts. It works like a multiple-choice field, allowing you to apply more than one label to a contact.
Use tags to identify contact sources, organise uploads, and build targeted searches. For example, Slerp and QR Code can help distinguish contacts by how they joined your database.
Open Contacts to view your database. You can choose to display Tags as a column alongside fields such as email, first name, and surname. The screenshot supplied for this guide shows the Tags column with slerp applied to contacts.
Create and apply tags
There are three ways tags can be created:
1. Tag contacts during an upload
When uploading a spreadsheet of contacts, add the tags you want to apply to the entire upload. This is useful for grouping contacts from the same event or source in one step.
2. Use tags from integrations
Connected integrations can automatically create and apply source tags as contacts enter the CRM. Examples include website forms and me&u. The tags available depend on your connected integrations and their setup.
3. Create a tag while editing a contact
- Add a new contact or edit an existing contact.
- Find the Tags field and type the tag name.
- If the tag does not exist, click Add option + or press Enter to create it.
Use consistent names so the same audience is not split across slightly different tags.
Find contacts using tags
- Open Contacts.
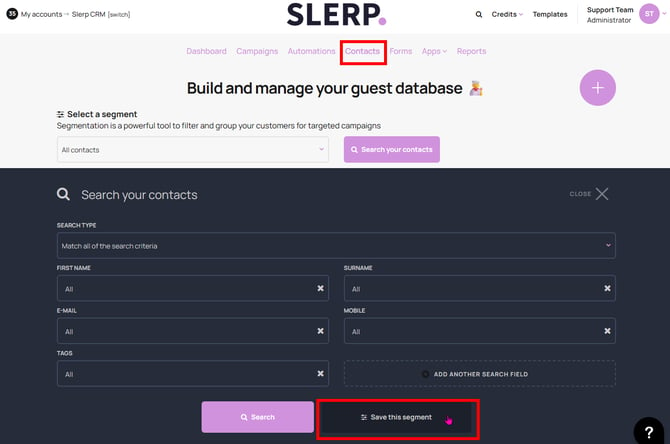
- Select Search your contacts.
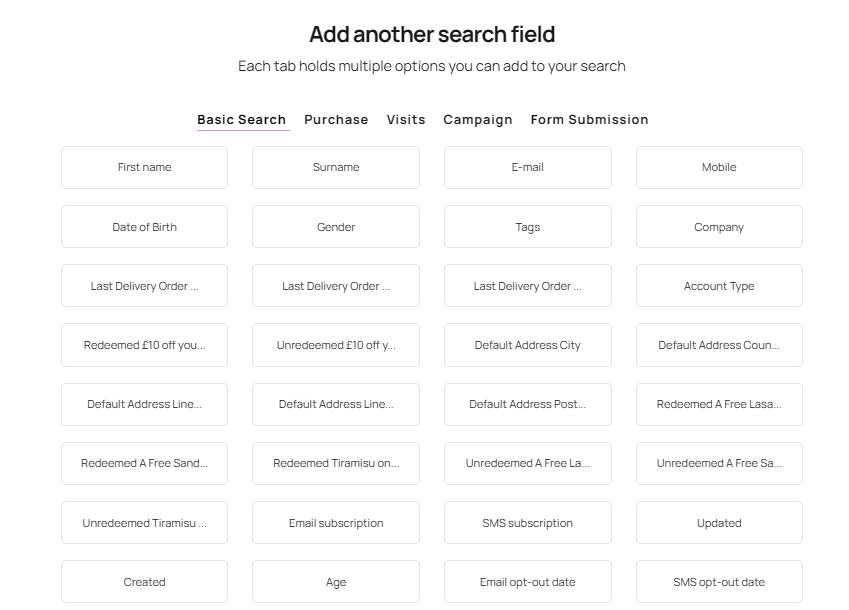
- Use Tags as a search criterion and choose the tag you want to match.
- Review the matching contacts before using the audience for a campaign.
For example, search for Cocktail Event to find contacts with that tag. To narrow the audience, combine it with VIP, making sure your search requires both tags if you want only contacts who have both.
Tags help organise contacts; they do not replace marketing consent. Check opt-in status before sending a marketing campaign.
Manage, rename, delete, or merge tags
To view and manage your existing tags:
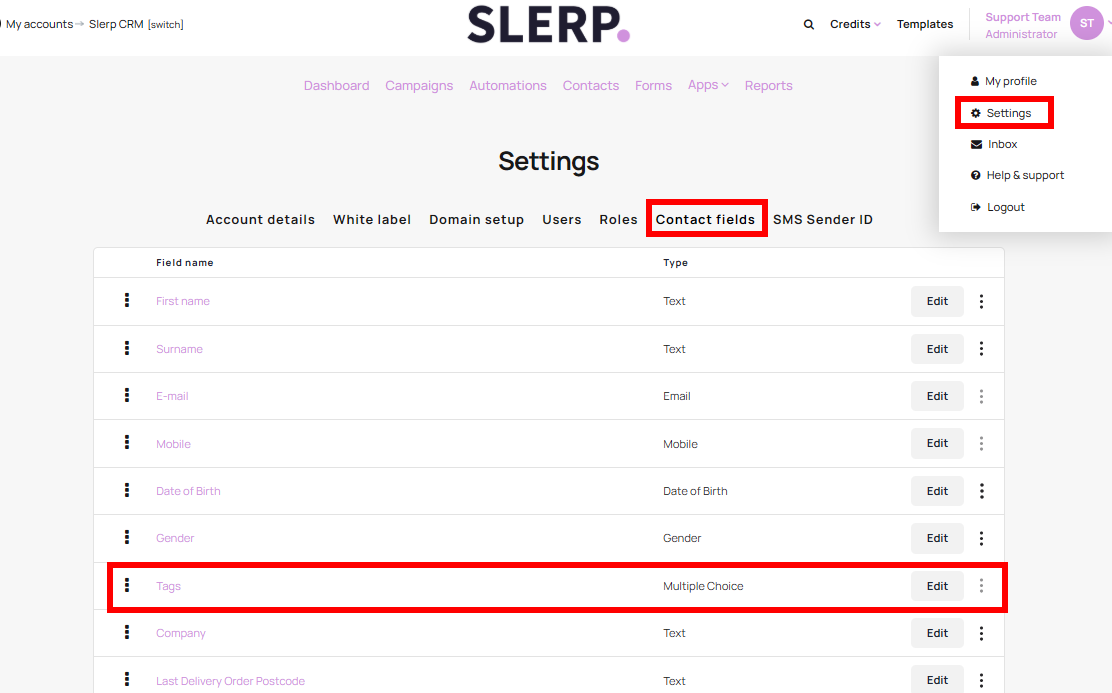
- Go to My Profile → Settings → Contact Fields.
- Find Tags and click Edit.
- In Update Contact Field, review the existing tag options.
Rename a tag
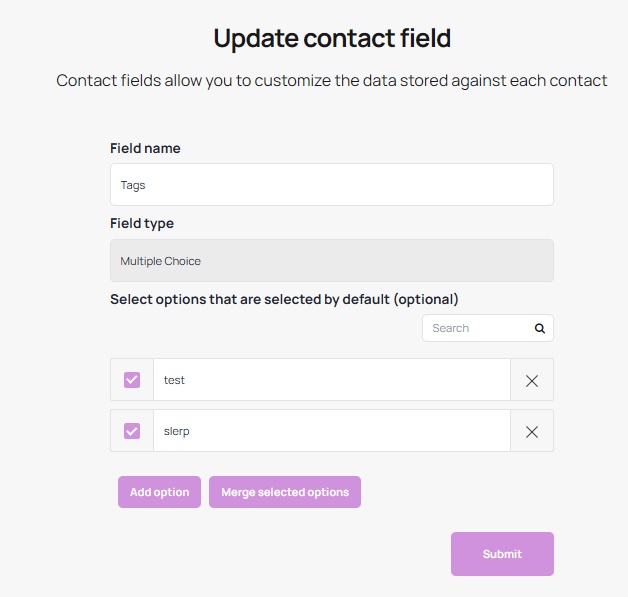
Edit the tag name within the list. The change applies across platform modules, including Forms, Automations, Contacts, and Reports.
Delete a tag
Before deleting a tag used in an automation criteria block, update that automation first. Also review any forms or other modules that depend on the tag.
Click X next to the tag to remove it. This removes the tag from every contact it is applied to and affects other modules using it. For example, a form configured to apply that tag will no longer do so.
Merge tags
- Select two or more tags.
- Click Merge Selected Options.
- Enter the name for the combined tag.
The new tag groups the contacts from the selected tags. Review the selected options carefully before merging.
Examples of useful segments
You may want to build segments such as:
- Customers who have not engaged recently
- Customers who bought a specific product category
- High-value customers based on spend
- Customers tagged for a specific preference or dietary need
- Contacts collected from a particular source
These segments can then be used for one-off campaigns or for ongoing automation.
Use segmentation for database cleanup
A healthy database matters.
You can use segmentation to identify contacts who are no longer engaging, then decide whether to:
- Run a re-engagement campaign
- Suppress them from future sends
- Clean up old or low-quality records
This helps protect deliverability and keeps reporting more accurate.
Build automated workflows
Automations are usually built using three parts:
- A trigger
- Criteria or conditions
- An action
For example, you might set up automations for:
- Welcome emails after signup
- Birthday offers
- Follow-up campaigns after a purchase
- Delayed offers based on order value or product type
Start simple
If you’re new to automation, begin with one or two high-impact journeys:
- A welcome journey for new signups
- A repeat purchase reminder
- A lapsed customer reactivation email
These are practical starting points and usually easier to maintain.
Final tip
Don’t automate everything at once.
Start with a small number of useful segments and workflows, then improve from real results.