
Creating an App
Prerequisites
Before you begin, make sure the following are in place:
- Your app has been enabled by Slerp — This will give you access to the App section in Controls. Contact Slerp if you have not already done so.
- Your menu and stores are fully set up — Apple and Google may reject your app if it does not appear functional. A complete menu and at least one active store are required before submission.
Apple and Google both require apps to be fully functional at the point of review. Incomplete or placeholder content is a common reason for rejection. See Apple's App Store Review Guidelines and Google Play's Core App Quality guidelines for more details.
Configuring your app
This section covers how to configure your app and how it will appear to customers on the Apple App Store and Google Play Store.
To access the app configuration, you will need to navigate to Designer > Mobile App > App Store in Controls.
To complete your submission, you will need to fill in all of the fields below in Controls. As you do so, you will be able to see a preview of how your app listing will look on both stores. This is not an exact representation of either platform, but will give you a realistic idea of how your app will appear to customers before you submit.
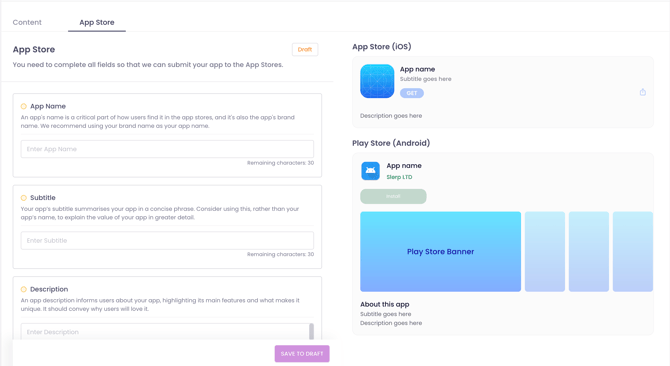
Each field includes guidance on the minimum requirements, such as character limits and image dimensions, directly alongside it in Controls.
App Name
Your app name is what customers will see when searching the app stores. It must be unique and should reflect your brand.
We recommend checking both the Apple App Store and Google Play Store before deciding on a name. If the name is already taken, your app may not pass review and you will need to choose a different one. In this case, consider appending a descriptive or geographical word, such as "Loyalty" or "UK", to make it unique.
Subtitle
Your subtitle is a short summary of what your app does. It should be concise and descriptive, and must not simply repeat your app name.
For example, "Slerp App" would not meet app store requirements, whereas "Order in advance & earn points" is a strong subtitle that clearly communicates the app's value.
Description
Your description gives customers a fuller picture of your brand and what your app offers. It should clearly explain the purpose of your app and encourage customers to download it.
Keywords
Keywords are words and phrases that describe your app and help the app stores surface it to the right customers when they search.
Here are some examples: order ahead, pre-order, click and collect, takeaway, food delivery, restaurant app, loyalty rewards, earn points, stamps, skip the queue, mobile ordering, local food.
A few tips:
- Do not repeat words already in your app name or subtitle as Apple does not count these towards search ranking.
- Avoid competitor brand names as both stores prohibit this under their metadata policies.
- Separate keywords with commas and no spaces to make the most of Apple's 100 character limit.
App Icon
Your app icon is the image customers will see on their device and in the app stores. It should be simple, recognisable, and reflect your brand. A logo or brand mark works well. Avoid using text where possible as it can be difficult to read at smaller sizes.
Play Store Banner
The Play Store banner is a feature graphic displayed at the top of your app's listing on the Google Play Store. It is the first visual customers see when they visit your app page and should be eye-catching and on-brand.
Splash Image
The splash image is displayed to customers while your app is loading. It is typically a full-screen image or your logo centred on a background colour. It should be clean and on-brand, and avoid containing too much detail as it is only visible for a short time.
Submitting your app
All fields must be completed before you can submit your app. If you do not have everything ready, you can save your progress as a draft and return to it later.
Once all fields are complete, submit your app from Controls. Slerp will automatically build and submit it to the Apple App Store and Google Play Store on your behalf.
The submission process can take up to two weeks. This includes review by Apple and Google, which is outside of our control. If your app is rejected, we will be in touch to help resolve it and will handle rejections on your behalf where possible.
Once your app has been approved and is live, its status in Controls will update to Live.
Updating your app
Once your app is live, you can update any of the configuration fields in Controls at any time. Any changes will require your app to be resubmitted to the Apple App Store and Google Play Store for review. Updates will be reflected in the app stores once the review process is complete.
We aim to process app updates every two weeks.