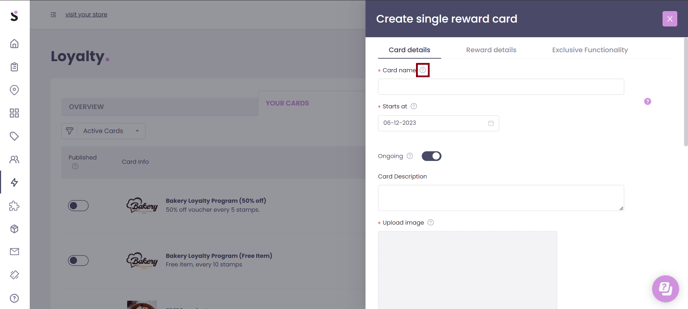
In order for your customers to start collecting points/stamps, you will need to create a Loyalty Card for them to be applied to. The process for this is straightforward, and you can follow the step-by-step guide below to create your first card:
Please click here to follow a live tutorial.
- Login to Controls (https://controls.slerp.com/) using your admin username and password.
- Click the Loyalty button in the left-hand menu.
- Click the Your Cards tab.
- Click the Add Card button.
- Enter a name for your card. This can be anything but we recommend making it something descriptive of the reward.
- Choose a Start Date for the card (this is the day that the cards can start collecting stamps from).
- Select if this is an Ongoing campaign or not. An Ongoing campaign has no end, if you switch this button to disabled then you can choose an end date for the campaign when the card will cease to function).
- Enter a Card Description. Again this can be anything, but we recommend making it something that describes the required items to be purchased.
- Upload an image to represent your card. This image should be a square image in order to comply with the layout of the card.
- Select either All Stores or only the ones that you want the card to function at. This will apply to both in-store and online orders, and we generally recommend enabling it for all stores so that the customer can earn points/stamps, and redeem rewards, at any of your locations.
- Select how many points/stamps should be awarded each time the customer orders the specified items (or items of the specified value).
- Select whether you would like traditional-style stamps, or points for tracking the card's progress. We recommend stamps for cards with smaller thresholds (up to 20), and recommend points for cards with thresholds above 20, as stamps can begin to feel cluttered once there are more than a certain number.
- Choose whether you want the points/stamps to be associated with a pound spend value, or with specific products. You can choose a single product, or multiple different ones, depending on your needs (in the example below I have selected a Big Red Tomato).
- You can limit the number of points/stamps that a customer can collect in a given timeframe by enabling the Stamp Frequency button. You can then select the timeframe (24 hours in the example below), and then specify a maximum number of stamps that any one customer can collect in the timeframe (5 in the example below).
- Click Next to proceed to the next portion of Card Creation.
- Please enter a short reward title.
- You can enter a description of the reward if required.
- You can enter a message to be displayed to customers who have earned enough points/stamps for their rewards if required.
- You can enter a message to be displayed to customers after they redeem their reward if required.
- Enter the number of points/stamps required to earn the reward.
- Set the reward type by choosing either a pound or percentage value to be removed from the cost of either the entire order (by disabling the Specific Product button), or specific products (by enabling the Specific Product button and choosing the product/s from the list). You can also choose to only apply the discount to variant prices or to include modifiers and extras in the discount. For example, you might have a 100% discount on a burger, but any extras that are added to the free burger will be charged.
- Set how many of the products the reward can be applied to. In the below example the product reward is limited to 1, otherwise, if it was 10 then the customer could claim 10 free Big Red Tomatoes.
- Click Save Card.
- Your Loyalty Card has now been created and is ready for use by your customers, just click the Publish button on the left. It will be automatically available to any user logged into the app, or ordering online.
- You can set an expiration date on a specific Loyalty Rewards by toggling on the ‘Reward
- Set the number on ‘Rewards expiration (Months)’
- Click save
- You can delete existing Loyalty Cards by clicking this button.
- You can generate QR codes by clicking this button.
For more information on Generating QR codes, please see the document titled "Collecting Points Offline".